Lead Magnets are a powerful way to get people to sign up for your email newsletter so you can build your mailing list. In essence, you’re offering them a bonus of some kind as they read your blog post to sign up.
That bonus could be anything from a discount, to a free trial of your software, to some sort of download. Downloads are the most common lead magnet by far.
In this article, I’ll show you step-by-step how to set up Amazon S3 to host your lead magnets and how to set up your email gathering forms and popups to deliver the lead magnets.
Step 1: Get an Amazon Web Services Account
If you don’t already have one, you’ll need to get an Amazon Web Services account. It’s not hard to do, and they even give you a lot of things for free. Here’s an overview of the process:

That’s all there is to it!
Here’s a link to the Amazon Web Service home page where you go to sign up.
Step 2: Create a New S3 Bucket
To do this, sign into the AWS console. Go to S3’s console. You’ll see a list of buckets (if you have any created) like this:
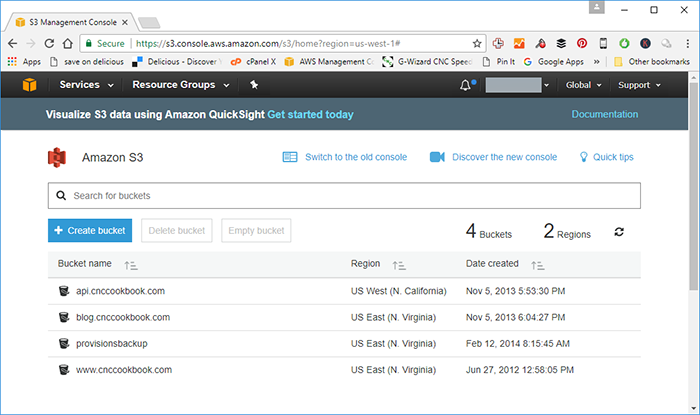
Click “Create bucket” button. You get a popup like this:
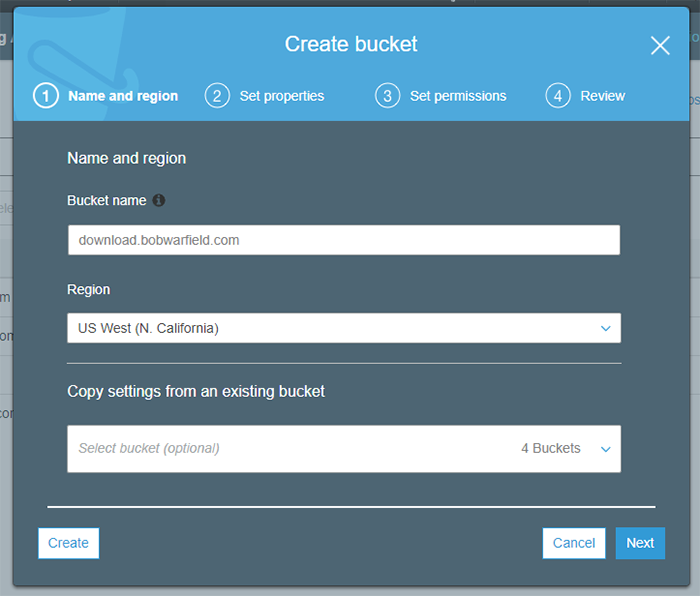
I’m calling my new bucket “download.bobwarfield.com” because I want to use it exclusively for downloading files. Don’t worry about the other choices.
Hit “Next” and you get a screen to set properties. It lets you enable things like versioning, logging, and tags. These are all pretty technical, and we don’t need them. Just click “Next” again.
Next is the window for “Set permissions”. Again, leave all the defaults alone and just click “Next”.
Now you’ve got a new bucket on your bucket list. Ooof, that just didn’t sound right, did it?
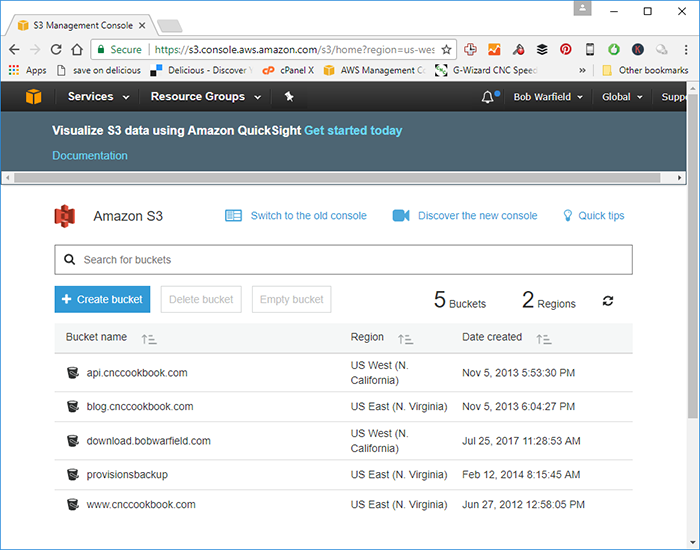
You should see your new bucket on the list. There’s “download.bobwarfield.com”.
Step 3 – Make the Bucket Into a Website
Now here’s a neat trick: you can make any Amazon S3 bucket into a website very easily. Not only that, but it’s a very fast and trouble-free web server. Other than copying new files up to it, I never have to mess with mine.
Click your bucket then click the “Properties” tab in the popup:
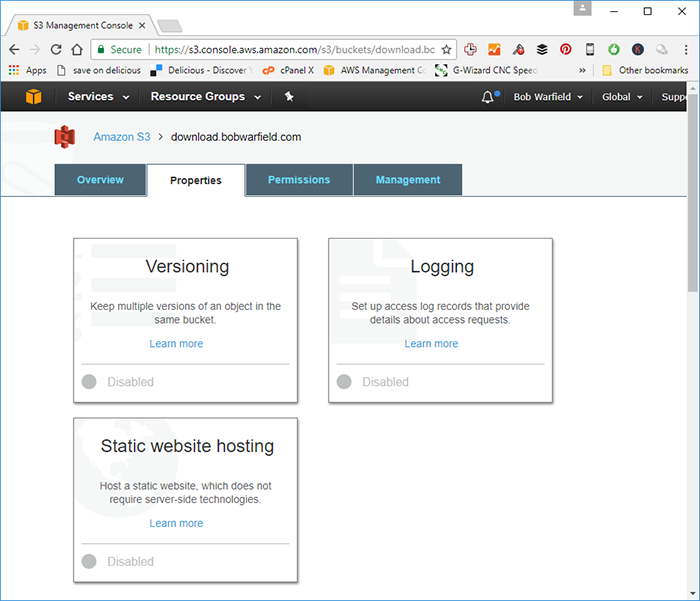
Notice the box called “Static website hosting”? Sweet!
Click that gray “Disabled” button on that bad boy to get your next popup:
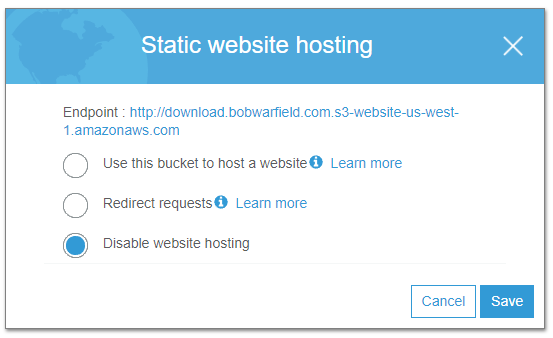
Now click “Use this bucket to host a website” and (of course!) you’ll see a new popup:
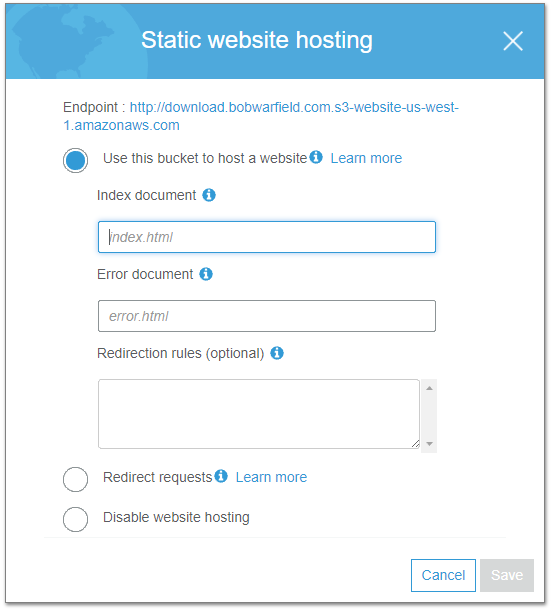
Now, we need to figure out what the home page (index document) for this thing will be and what to do in the event of an error (e.g. someone asks for something that isn’t there due to a typo).
To deal with this, you’ll need to create 2 static html web pages. One serves as the home page, and one serves as your error page. Given that I will be using this “web site” purely for downloads, I decided to just create one page that refers them back to my main blog.
To make the pages, I created a super simple page in WordPress that looked like this:

Never mind the stars, they won’t make it into the final version.
Then, I brought up the page and did a “View Source” in Chrome. Out of all that crazy html code, here’s all you really need:
<h2 style=”text-align: center;”>Want Help Starting or Growing Your Business?</h2>
<p style=”text-align: center;”>Check out <a href=”http://bobwarfield.com”>BobWarfield.com</a> for tons of tips from a seasoned entrepreneur.</p>
Now, I strip out the style information since it won’t be available on my simple pages and get this even simpler html:
<h2>Want Help Starting or Growing Your Business?</h2>
<p>Check out <a href=”http://bobwarfield.com”>BobWarfield.com</a> for tons of tips from a seasoned entrepreneur.</p>
Pretty basic, right?
It’s easier for you if you just modify my snippet. Copy and paste it into notepad and save it with a filename like “index.html”.
Now just tell Amazon S3 to use that one for both the Index and Errors:
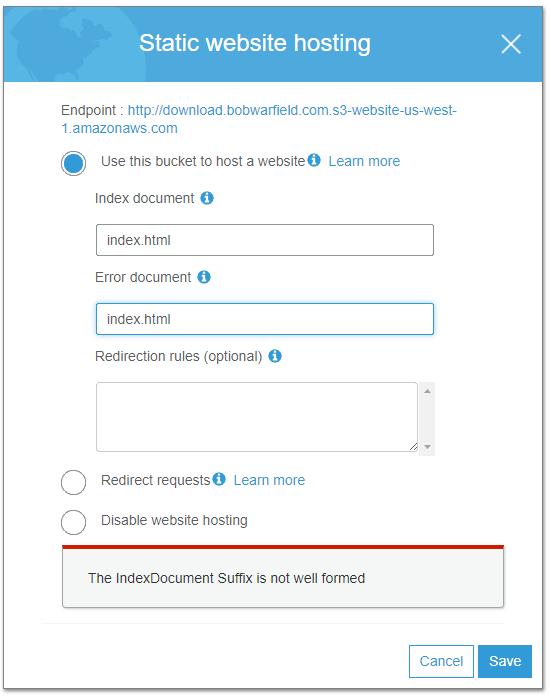
Remember, the only time anyone will ever see this is:
- If you make a typo on a download link
- If someone tries to mess around on your download website and doesn’t know what URL’s are valid
Neither one is going to happen very often, but if it does, they’ll get the brief page directing them back to your main website, so no worries!
Now, before you leave this box, make a note of the URL at the top of the box labeled “Endpoint”. For my bucket just created it is:
http://download.bobwarfield.com.s3-website-us-west-1.amazonaws.com
See how that works? Pretty simple!
Step 4 – Set Up a Fancy Domain URL
I can’t walk you through all the details of setting up a fancy domain URL, because it varies depending on your DNS provider. Suffice to say you do need to have access to your DNS though to do this. Depending on your WordPress host, they may or may not be able to help if you don’t already have your own DNS provider.
I like to have my own so I have more control and can lash together different services like this. I use DNS Made Easy for mine. It’s cheap and cheerful.
Here’s the bottom line:
You don’t really need to do this. What it gives you is prettier URL’s. Instead of:
Click to access mydownload.pdf
you can use:
Click to access mydownload.pdf
The thing is, people won’t notice these URL’s much as they’re only for downloading.
Create a CNAME Record in DNS Made Easy
OK, if you’re still with me on this, and you’re technical (a little anyway) enough to manage your own DNS, you’ll see how to do this from what I did in DNS Made Easy.
To add “download.bobwarfield.com” to my DNS Made Easy profile, I had to create a CNAME record. It’s pretty simple to do and looks like this:
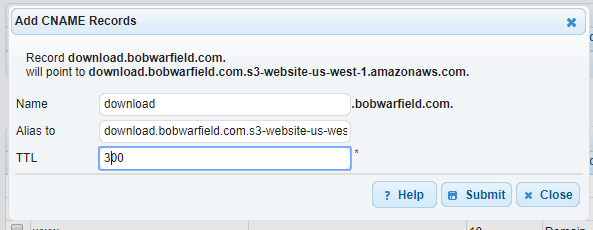
There’s just 3 fields needed:
- Name: What’s the subdomain name you’re putting in front of your main domain?
- Alias to: Give the ugly URL that Amazon S3 offers. In DNS Made Easy, I have to end it with a dot or it appends a redundant “bobwrfield.com” to it.
- TTL: This is how long it takes if you change this record for everyone to see the change. A low number will mean lots of traffic to your DNS, which drives up your cost. A big number means it takes a long time to fix a mistake. I’m just using 300 since my traffic is low and my DNS is cheap.
Step 5 – Upload Your Files to Amazon S3
First thing’s first. We’d better upload that index.html file we created in notepad.
In the Amazon S3 Console, click the “Overview” tab. Notice there’s an “Upload” button:
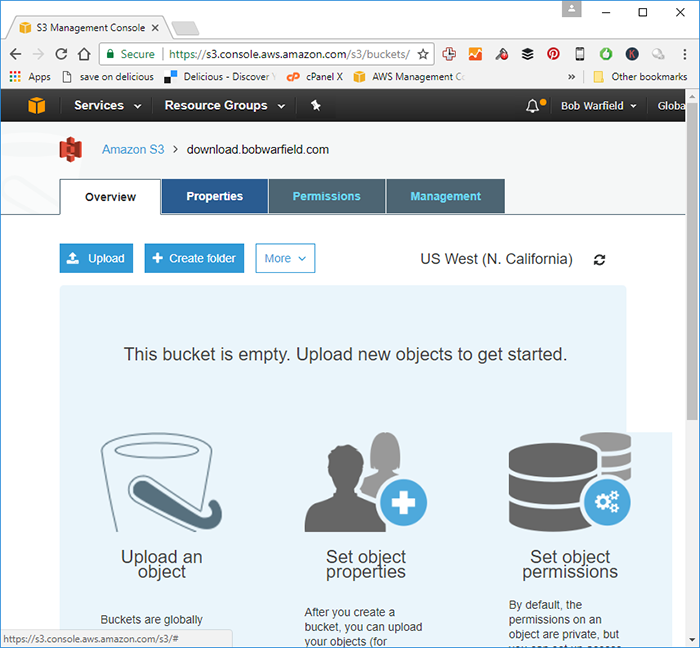
Click the “Upload” button!
It’ll let you browse or drag and drop files. I keep a folder structure on my PC that matches the structure of my download web site. This makes it easy to keep it all organized and manage my uploads.
After selecting files, hit next. On the permissions screen, be sure to grant public read access to your file so everyone can access it for download.
The next screen is properties, and I just leave the defaults alone.
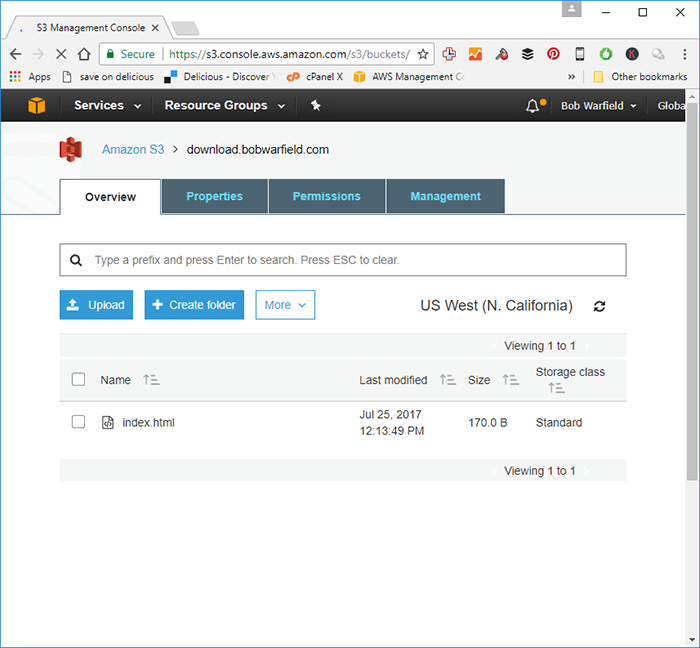
Once your file is uploaded, refresh the browser on the Amazon S3 console Overview and you’ll see your new file is there:
Step 6 – Test Your Download
I always test these things as users get really frustrated when things don’t work as they should. In this case, I just bring up my browser and see if I get the index page by entering the following URL:
http://download.bobwarfield.com
Remember to use whatever URL S3 is set to, custom or their vanilla version. Here’s what I get:
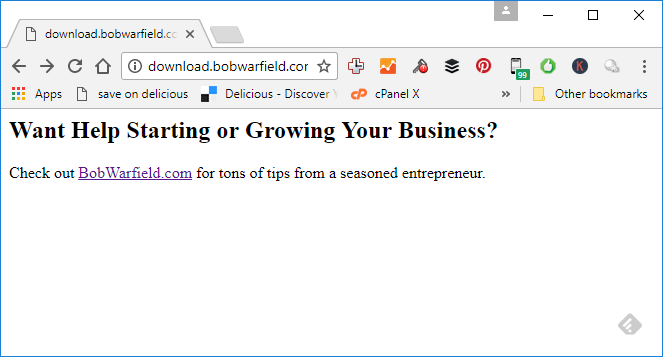
Hooray!
Yes, it’s homely, but serviceable. And remember, you can put whatever html you want there if you need something fancier.
Step 7 – Create a Lead Magnet Offer and Point it To Your New Download Site
Now you’re all set, right? Time to get some Lead Magnet Offers into your blog posts!
First, you need to create a lead magnet that’s relevant to your article. An easy place to start is to simply offer a PDF version of the article. It’s really easy to create one as I show in this quick video:
The whole video is a little over 3 minutes and I take you through everything I did in real time. Trust me–you can do this easily!
BTW, if you’re a visual learner or like videos, be sure to subscribe to my YouTube channel.
I created a template for freebies using some clipart:

I can plug the offer in right under where it says “FREEBIE”. Something like this:

Plug that into your blog post. Now, set up a link to the image to take them to your newsletter signup.
You can do this in a couple of ways.
- Create a dedicated freebie signup page that has a signup form. You will need a different page for each Freebie.
- Use a popup that can be triggered by a click on an image. I use SumoMe for that purpose.
Now here’s the important part:
Whether you use a form or a popup, most all of them will take the email and any other fields you require (like a name), sign them up to your email provider, and then they’ll have an option to redirect them to a new page.
What you want to do is give the URL for your freebie on the S3 download website as the page to redirect them to. If you have a pdf for them there, it’ll cause the browser to immediately start downloading that pdf for them.
Congratulations!
You now know how to use S3 to do Lead Magnet (and any other) downloads!
You might as well try it out. By now you’ve noticed I offered a PDF version at the top of this blog post. Go ahead, try it out, see how the whole thing works. Then try it on your own website.
Lead Magnets are critical for getting good signup rates to your mailing list.
If this article resonated and you'd like more just like it, sign up for our Entrepreneur's Newsletter. You'll receive a free mini-course Work Smarter and Get Things Done. It teaches you how to maximize your productivity so you can get everything you need to do for your business done. It even includes our free productivity software to get you organized, focused, and productive.

Hey Bob, what is the main reason for using Amazon to host files in the first place? I see plenty of people doing it.
I’m just hosting my large docs on Google Drive (docs too large for WP Media Library) and send people a link to the doc directly. This works just fine, and cost me a couple of bucks per month for 100Gb of storage (which I use for a variety of purposes), so wondering why I might need Amazon S3?
Cheers
Matt
Hi Matt. From my perspective this choice boils down to features vs simplicity.
Dropbox is dead simple and works. If it’s doing what you need, stick with it.
S3 is more complicated, though entirely doable even for relatively non-technical people. I feel it is more scalable as your audience and needs grow, but it is also more flexible.
For example, I can stick a custom domain on it like I describe above.
I feel there’s also more issues from a security standpoint. Dropbox is on my machine. It has access to every file there. If I manage to screw up a share or Dropbox gets hacked or has a bug, I’m wide open.
But S3 is up in the cloud and doesn’t access my machine directly. If it gets hacked, my uploaded files are in trouble, but I have copies back here at home safe and sound. I can change passwords, reupload or upload to a different service, and I am back in action quickly and easily.
These are all fine points that may or may not matter to you. As I say, Dropbox is certainly simpler.